Been trying to make a passably-realistic design of footprints in sand. Can a decent image be made using standard effects (fx) without having to resort to custom vectors and blends. I think the answer is ‘yes’ and here’s how.
Most of the techniques in this article I have learned over the last year or so by doing Chris Hildenbrand’s challenges in the Facebook Group, Affinity Designer Hands On. In particular the neon lights one.
Overview
- Start with good reference images so we know what we are trying to achieve. I’ve not included these here because I don’t own them.
- Make a basic foot print set of vector shapes and give them a sand-coloured fill. I added 100% noise to look like sand. Choose a blend mode — I found Soft Light worked well for my design.
- Set the background to be sand coloured, and maybe give it a gradient fill so it looks like strong sunlight from one side (good for strong shadow in the footprints).
- Select all the foot shapes and make into a Symbol so that we only have to modify one foot each time we find an improvement.
- Duplicate the Symbol and flip it horizontally so that we have a pair of footprints, one for each foot of the biped.
- Use the transparency tool to fade out the arches of the foot which do not make much of an impression in the sand as we walk.
- Finally, add the standard effects (fx) to the shapes within the symbol to make the footprint look realistic. Make sure that “scale with object” is ticked or you’ll be in trouble later when placing the footprints in a scene.
Reference images
I searched the Web for footprint images. Found loads of human ones and some ones from birds so stored that idea for later. I preferred the ones with a strong side light from the sun to cast shadows within the print as well as causing a strong rim light round the edge of the prints.
I created the basic shapes as below and, obeserving my reference images, added some transparency to make the edg edge of the ball of the foot and the arch of the sole less prominent in the print. I added 100% noise to look like sand. Choose a blend mode — I found Soft Light worked well for my design.

That is the basic footprint pair (identical mirror images, a singe Symbol) ready for the background and effects to be added.
I used a gradient fill for my background so that the sun light-source direction was clear when it came to adding fx to the footprints and added 100% noise for a sand effect:

Choosing the fx
The image above shows the shapes within the footprint symbol and a flipped duplicate Symbol. Whatever changes we make to one will be added to the other, but the flipping is cleverly taken into account so that the shadows etc still work.
First I added inner shadow to give the footprints depth. The background shows that the light source is top right, and the shadow is positioned accordingly using Inner Shadow fx:

The result is as shown:

Next I wanted an inner highlight. I did not use the Inner Glow fx becasue it cannto be controlled as well as shadow can. Instead, I added a second Inner Shadow but with colour set to orange and blend mode set to Screen:

Next was catching the rim light on the top edges of the footprint. Again, rather than Outer Glow, I used Outer Shadow with colour orange and blend more Screen:

The final fx I tried was Gausian Blur. I wanted to make the image less like sharp vectors and more like footprint in sand. So, I added a smidge (0.5 px) of blur:

Gallery
Here is a gallery of the stages of fxs being added so that you can see them side by side:
Final image
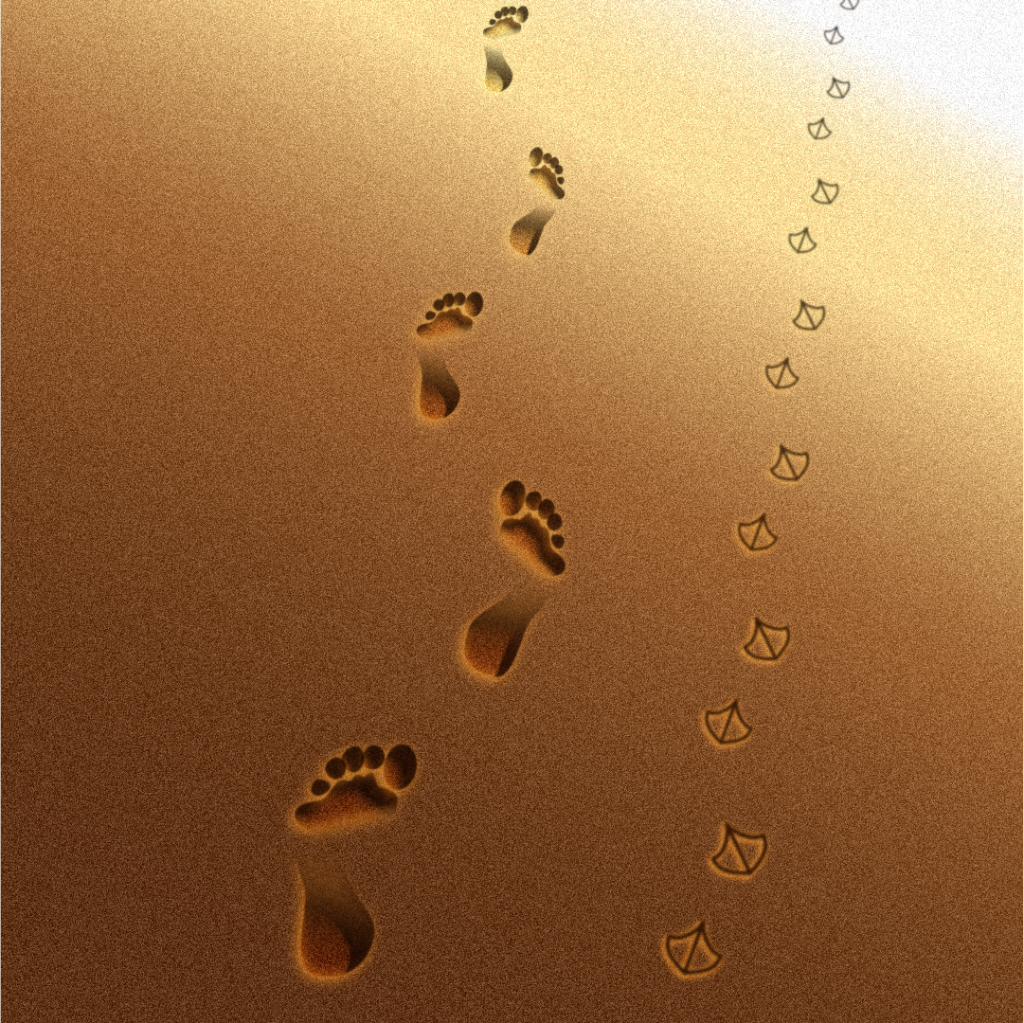
The last step was to place the footprints in a scene. They are all just duplicates of the same symbol but scaled to appear to be getting further away. For the final image, I decided to make set of human prints joined by seagull prints:

Leave a comment